How to Deploy Projects using Chef Automate in 8 easy steps


Audio : Listen to This Blog.
The previous blog gives introduction of Chef Automate Workflow. This blog explains how to use Chef Automate for deploying a project.
Prerequisite:
Delivery CLI Tool
This is the command line tool required for running all Automate commands. It can be used to setup and execute phase jobs as well as interact with a Chef Automate server.
Delivery CLI tool comes as a part of Chefdk: https://downloads.chef.io/chef-dk
Chef Automate Setup:
This is the first step that does the basic configuration. It configures the workstation to talk to the Automate Server. The following command is used for doing the setup:
$ delivery setup --server=12.34.567.89 --user <automate-user> --org <org-on-automate>
This creates a “~/.delivery/cli.toml” file which contains the configuration. Contents of “cli.toml” file look like this:
git_port = "8989"
organization = "msys"
pipeline = "master"
server = "12.34.567.89"
user = "nimishas"
Creating a new project
Chef Automate uses projects to organize work across multiple teams. You can create one project for each major component of your system. Each project has its own Git repository. Chef Automate can host the Git repository for you or you can connect Automate to an existing project, such as one on GitHub or Atlassian Bitbucket. In this blog, you get starter code from GitHub but host your project in Automate’s Git repository.
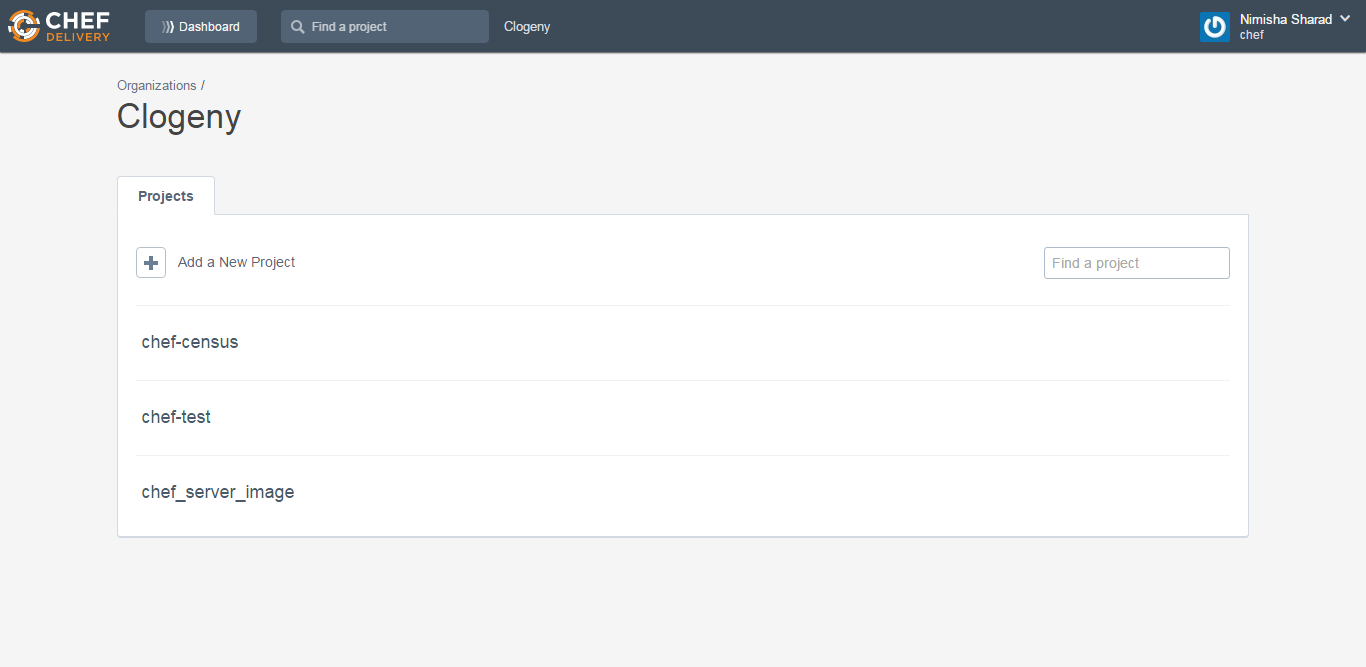
The picture below shows how projects look on the Chef Automate web UI. Here “Clogeny” is the Organization and projects are listed below.
Please follow the steps given below
1. Get Delivery Token
$ delivery token
This command is used for fetching the delivery token which is used for authentication.
2. Clone your project from git
$ git clone <path to github repo>
3. Go to your project directory
$ cd <my-project>
4. Run Delivery init
$ delivery init --project <project_name>
Delivery init does the following :
- Creates a project in Chef Automate, which includes a new Git repository that’s hosted on the Automate server.
- Creates a default pipeline whose target branch is master.
- Initializes the master branch in Automate’s Git repo from the existing master branch that you just cloned (delivery init detects whether there is an existing Git repository).
- Creates a branch named add-delivery-config, which is based off of master.
- Creates the delivery directory and adds to it a build cookbook and a configuration file. This directory contains config.json file.
- Submits the change for review.
- Opens automate web UI and starts the Verify stage.
Monitor Verify Stage
In the previous step, “delivery init” opened Automate web UI and started the Verify stage. You can see the phases of Verify stage(i.e. Unit, Lint and Syntax) running on the Interface.

As the picture above shows, Unit and Lint phases have failed. So you need to modify your code and fix those issues.
You can get the details of failed phases by clicking on the phase.
After fixing the issues, all phases should pass.

Pushing changes to an existing project on Chef Automate
Now your project already exists on Chef Automate github repo and you want to add changes to it. Following steps need to be followed:
1. Clone your project from automate
$ delivery clone <project-name>
2. Create a new branch for your changes
$ git checkout -b <branch_name>
3. Make changes and commit them (don’t push)
$ git add <files>
$ git commit -m "commit message"
4. Submit the change to automate
$ delivery review
Similar to “delivery init”, a browser window opens to show the pipeline in Chef Automate. The Verify stage is automatically triggered and runs the unit, lint and syntax phases.
View your pushed changes on Automate Portal
All the commits made by you will appear under your project on the automate portal. The image below explains it:

Build Cookbooks
Build cookbooks are used to define what happens at each phase of Chef Automate. These can be defined as per the project requirement.
Let’s have a look at the Chef Automate Phases again:

Now take a look at “.delivery” directory which is created after running “delivery init” command. Try to map it with the phase diagram shared above.
C:\USERS\CHEF\Automate-workstation\some_project\.delivery
│ config.json
|
└───build-cookbook
│ .kitchen.yml
│ Berksfile
│ chefignore
│ LICENSE
│ metadata.rb
│ README.md
│
├───data_bags
│ └───keys
│ delivery_builder_keys.json
│
├───recipes
│ default.rb
│ deploy.rb
│ functional.rb
│ lint.rb
│ provision.rb
│ publish.rb
│ quality.rb
│ security.rb
│ smoke.rb
│ syntax.rb
│ unit.rb
│
├───secrets
│ fakey-mcfakerton
│
└───test
└───fixtures
└───cookbooks
└───test
│ metadata.rb
│
└───recipes
default.rb
Under the “build-cookbook” folder, you will be able to see recipes for each phase i.e. lint, syntax, unit etc. Each phase has a separate recipe. The same recipe runs for a phase, no matter at which stage it is running. e.g. Same syntax recipe is run at verify and build stage.
Delivery Truck
If you don’t want to go through the process of defining all the build cookbooks, you can use “delivery-truck” cookbook which has predefined build cookbooks. For example, its unit recipe runs ChefSpec and its lint recipe runs Foodcritic and RuboCop. The “delivery-truck” cookbook is already added as a dependency in your Automate Project. You can verify this in the matadata.rb of your project.
All the build cookbook recipes include implementation provided by delivery-truck by default.

Configure Build Cookbooks
“delivery init” command creates “.delivery\config.json” file in your project directory.This file is used for configuring the behavior of your Build cookbook. The contents of this file are explained below:
{
"version": "2",
"build_cookbook": {
"git": "https://github.com/opscode-cookbooks/delivery-truck.git",
"branch": "master",
"name": "delivery-truck"
},
"skip_phases": [
"smoke",
"security",
"quality"
],
"delivery-truck": {
"lint": {
"foodcritic": {
"ignore_rules": ["FC009", "FC011", "FC031", "FC045"]
}
}
}}
Here in the build_cookbook section, git repo is specified. You can also give path of your build cookbooks here like this:
{
"version": "2",
"build_cookbook": {
"name": "build-cookbook",
"path": ".delivery/build-cookbook"
},
"skip_phases": [],
"build_nodes": {},
"dependencies": []
}
You can define which phases to skip (though it’s advisable not to skip). You can also define which Foodcritic rule to skip. Please refer this for customizing delivery-truck behavior.
Note: You need to commit “.delivery\config.json” file into Automate after making changes.
Approve Changes
Once you are done pushing all your changes to Automate, next step is to review and approve the changes. This is a manual step where your team can approve the change and move it to build stage. They can add comments by clicking on the patch set.

Once all the review comments are fixed, the changes can be approved by clicking on “Approve” button on the top of your patch set:
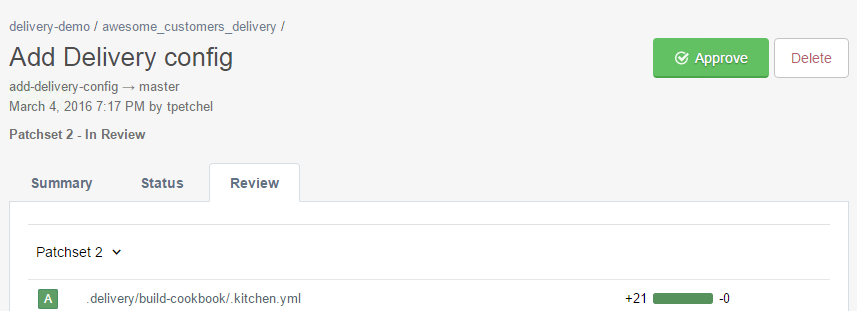
The Approve action merges your branch into master branch and deletes your branch.
Deliver the change
After Approval, the change moves to Build stage where your source code is verified against various phases and then Acceptance stage where the resulting artifacts are verified.
Once the Acceptance stage has passed, team needs to decide whether the changes should be delivered or not. Change can be delivered by click on the “Deliver” button as shown in the picture below:
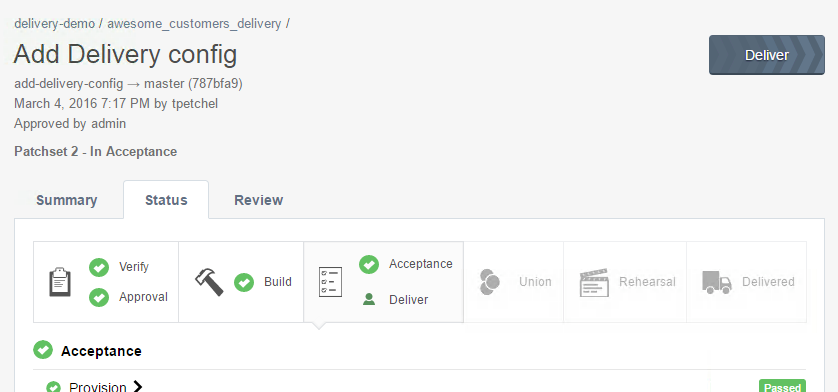
After hitting the “Deliver” button, the process moves to Union, Rehearsal and Delivered Stage where Provision, Deploy, Smoke and Functional phases run repeatedly.
The Union, Rehearsal, and Delivered stages form a shared pipeline, where all the projects that make up the entire system come together. All three stages have the same phases.
Once all stages have passed, the Automate UI appears as follows:

The definition of “delivered” vary according to the project’s requirement.It could mean deploying your changes and making them live, or publishing a set of artifacts for the customers.
References:
https://learn.chef.io/automate/