How to Benchmark CassandraDB with YCSB Workloads on All-Flash Block Storage?


Audio : Listen to This Blog.
Introduction:
The purpose of this blog is to showcase how YCSB can be used to benchmark Cassandra DB, bench-marking Cassandra Cluster with YCSB on CentOS 7.4. Below are the 5 key steps to follow before benchmarking CassandraDB with YCSB workloads on all-flash block storage.
1. Configuration
Below is the setup we used for experimenting Cassandra DB benchmarking with YCSB
Three VM’s (VMware) with CentOS release 7.4.x installed.
- 1st VM have YCSB 0.15.0 installed.
- 3 VM’s has Cassandra 3.11.4 installed (Clustered node Cassandra).
Below are the versions of software used to benchmark Cassandra on YCSB:
- OS version : Centos 7.4.1708
- YCSB : 0.15.0
- Cassandra : 3.11.4
- Open JDK version : 1.8.0_212
- Python version : 2.7.
2. Prerequisites
Below are some the prerequisites before we proceed for Cassandra and YCSB installation.
- Yum package management application must be installed.
- Root or sudo access to the install machines.
- Latest version of Oracle Java Platform, Standard Edition 8 (JDK) is recommended
- Python 2.7+
3. Cassandra Setup
Apache Cassandra is an open source distributed database management system designed to handle large amounts of data across many commodity servers to provide high availability.
This section covers steps on how to install and configure Apache Cassandra.
Setting up Cassandra on all 3 VM’s running CentOS 7
Step 1: To install OpenJDK, on your system type:
| sudo yum install java-1.8.0-openjdk-devel |
Step 2: Verify the Java version:
| [root@cassandra1 ~]# java -version openjdk version “1.8.0_212” OpenJDK Runtime Environment (build 1.8.0_212-b04) OpenJDK 64-Bit Server VM (build 25.212-b04, mixed mode) |
Step 3: Setup test cassandra cluster. On all 3 centos7 install add cassandra repository in /etc/yum.repos.d/
| # cat cassandra.repo [cassandra] name=Apache Cassandra baseurl=https://www.apache.org/dist/cassandra/redhat/311x/ gpgcheck=1 repo_gpgcheck=1 gpgkey=https://www.apache.org/dist/cassandra/KEYS |
Step 4: Install cassandra package
| # yum install -y cassandra |
Step 5: Edit /etc/cassandra/default.conf/cassandra.yaml and setup there below parameters (ip address of all 3 VMs)
| seeds: “10.20.178.220,10.20.178.99,10.20.178.14” listen_address: 10.20.178.220 rpc_address: 10.20.178.220 |
Note: Adapt above to specific cluster environment vars. listen_address and rpc_address has to be address of cassandra node
Step 6: Open ports, 7000/tcp, 9042/tcp
| firewall-cmd –zone=public –permanent –add-port=7000/tcp firewall-cmd –zone=public –permanent –add-port=9042/tcp> systemctl restart firewalld |
Step 7: start cassandra on all three boxes
| # service cassandra start # chkonfig cassandra on |
Step 8: Check Cassandra service status :
| [root@cassandra1 ~]# /etc/init.d/cassandra status ● cassandra.service – LSB: distributed storage system for structured data Loaded: loaded (/etc/rc.d/init.d/cassandra; bad; vendor preset: disabled) Active: active (running) since Sun 2019-05-05 04:04:42 EDT; 4 days ago |
Step 9: After this nodetool status should list cassandra nodes
| [root@cassandra1 ~]# nodetool status Datacenter: datacenter1 ======================= Status=Up/Down |/ State=Normal/Leaving/Joining/Moving — Address Load Tokens Owns Host ID Rack UN 10.20.178.99 308.1 KiB 256 ? b5c36d19-9442-4616-b462-932c0e667e2c rack1 UN 10.20.178.220 306.86 KiB 256 ? 9036ce41-b9d2-4dad-8c1e-629307cafc43 rack1 UN 10.20.178.14 319.35 KiB 256 ? 0f70d522-8c48-4da5-ab44-c8b5714642c0 rack1 Note: Non-system keyspaces don’t have the same replication settings, effective ownership information is meaningless |
Notes:
Apache Cassandra data is stored in the /var/lib/Cassandra directory, configuration files are located in /etc/Cassandra and Java start-up options can be configured in the /etc/default/Cassandra file
4.Verifying Cassandra Installation
Once you are done with Cassandra installation, you need to verify a few things to make sure Cassandra is up and connectable state.
Check if you are able to connect to the database using cqlsh.
The Cassandra Query Language (CQL) is the primary language for communicating with the Cassandra database. The most basic way to interact with Cassandra is using the CQL shell, cqlsh. Using cqlsh, you can create keyspaces and tables, insert and query tables, plus much more.
| [root@cassandra1 ~]# cqlsh 10.20.178.220 9042 Connected to Test Cluster at 10.20.178.220:9042. [cqlsh 5.0.1 | Cassandra 3.11.4 | CQL spec 3.4.4 | Native protocol v4] Use HELP for help. cqlsh> |
As you can see above, you are able to connect to Cassandra using cqlsh. Its displays the Cassandra version as 3.11.4.
5. Installation and configuration of YCSB:
Step 1: Download latest release of YCSB on VM1 (10.20.178.220).
| sudo mkdir ycsb cd ycsb curl -O –location https://github.com/brianfrankcooper/YCSB/releases/download/0.15.0/ycsb-0.15.0.tar.gz tar xfvz ycsb-0.15.0.tar.gz cd ycsb-0.15.0 (0.15.0 is the latest, https://github.com/brianfrankcooper/YCSB/releases/) |
Step 2: Run YCSB:
- Now we are ready to use YCSB:
2. Enter the following command in the command prompt (or terminal) from YCSB folder location, YCSB should invoke the help menu:
This describes the supported commands, databases and options for YCSB to be used.
[root@cassandra1 ~]# cd ycsb/
[root@cassandra1 ycsb]# ls
ycsb-0.15.0 ycsb-0.15.0.tar.gz
[root@cassandra1 ycsb]# cd ycsb-0.15.0
[root@cassandra1 ycsb-0.15.0]# bin/ycsb
usage: bin/ycsb command database [options]
Commands:
load Execute the load phase
run Execute the transaction phase
shell Interactive mode
Step 3: Examples of usage: Cassandra using YCSB
- Create a keyspace called ‘ycsb’
- Create a table called ‘usertable’
| [root@cassandra1 ycsb-0.15.0]# cqlsh 10.20.178.99 9042 cqlsh> create keyspace ycsb … WITH REPLICATION = {‘class’ : ‘SimpleStrategy’, ‘replication_factor’: 3 }; cqlsh:ycsb> create table usertable ( … y_id varchar primary key, … field0 varchar, … field1 varchar, … field2 varchar, … field3 varchar, … field4 varchar, … field5 varchar, … field6 varchar, … field7 varchar, … field8 varchar, … field9 varchar); |
Step 4: Run basic load test
| [root@cassandra1 ycsb-0.15.0]# ./bin/ycsb load cassandra-cql -p hosts=”10.20.178.99″ -s -P workloads/workloada [root@cassandra1 ycsb-0.15.0]# ./bin/ycsb run cassandra-cql -p hosts=”10.20.178.99″ -s -P workloads/workloada |
Benchmarking test:
Now we are ready to benchmark Cassandra using YCSB.
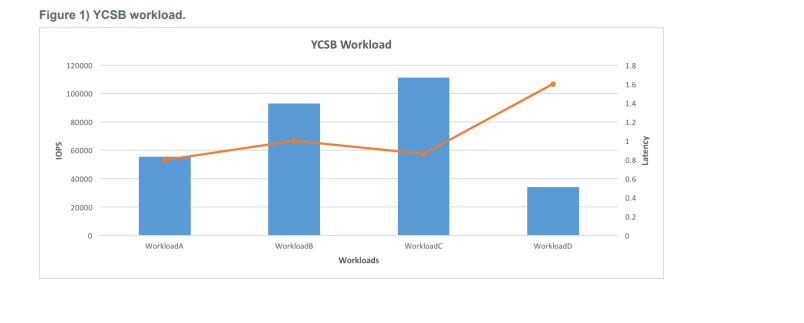
Workloads Used: A, B, C.
- Workload A: Update heavy workload: 50/50% Mix of Reads/Writes
- Workload B: Read mostly workload: 95/5% Mix of Reads/Writes
- Workload C: Read-only: 100% reads.
The following command was used to run workload A, B & C where threads were 8, 16, 32, and 64:
References
Cassandra configurations:
https://linuxize.com/post/how-to-install-apache-cassandra-on-centos-7/
YCSB workloads:
https://github.com/brianfrankcooper/YCSB/wiki/Running-a-Workload
https://github.com/brianfrankcooper/YCSB/wiki/Core-Properties